
Overview
In the last few years, the way teams design and deliver digital experiences has changed dramatically. I still remember a project where the marketing team was excited about their new content, but the development team struggled to surface it consistently across web, mobile, and third-party apps. The CMS felt like a bottleneck, and every new channel required custom work and complicated integrations. That was before Sitecore’s new content delivery model—and before the Content SDK and Experience Edge made it possible to deliver the same piece of content anywhere, instantly, through clean, composable APIs. In this blog, I will explore that transformation and will talk about the Sitecore API for the technical team. This blog will provide a practical, end-to-end view of how these APIs fit into modern architectures. We will specifically walk through how any external system can call the Authoring API using GraphQL, how to execute common GraphQL mutations such as create, update, delete, rename, and move. If you’re building integration services or automation pipelines for SitecoreAI, this will give you a complete picture of what’s possible
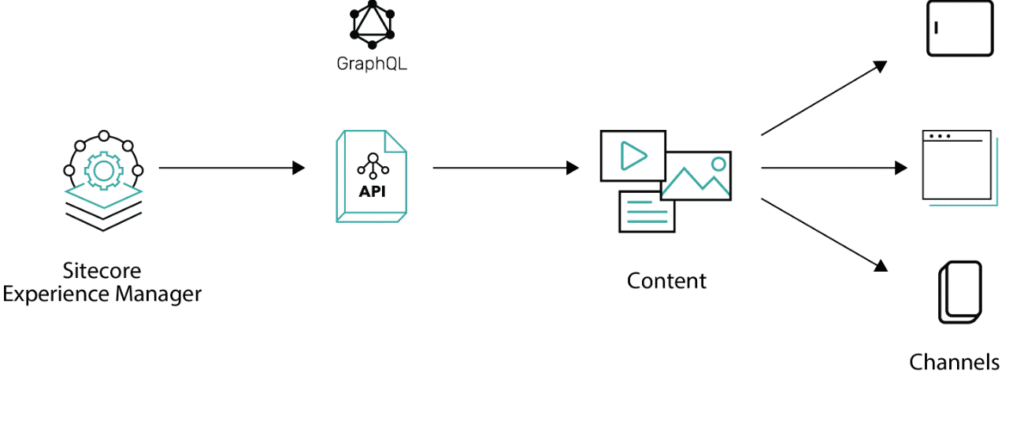
Sitecore’s modern architecture separates content operations into three distinct API layers. This crucial separation is designed to ensure scalability, security, and clear responsibility boundaries across the content lifecycle.
Technical Breakdown
Let’s break down the purpose and typical use case for each API:
1. Experience Edge Delivery API
The Experience Edge Delivery API is Sitecore’s public-facing endpoint, dedicated purely to high-performance content delivery.
- Primary Use: Used primarily by your front-end applications (ex- Next.js, React, mobile apps) and kiosks to fetch published content for your presentation layer.
- Core Function: It is fundamentally read-only and does not support content creation or modification.
- Interface: Exposes a GraphQL endpoint that allows for querying items, fields, and components efficiently.
- Authentication: Requires minimal or no complex authentication (often just an API key) when fetching published content, as it is designed for global, low-latency access.
- Endpoint: https://edge.sitecorecloud.io/api/graphql/v1
2. Authoring API (GraphQL)
The Authoring API is the control center for all item-level content management operations from external systems.
- Primary Use: This is the API you use when building integration pipelines, external systems, or third-party applications that need to manipulate content programmatically.
- Core Functions: It allows external systems to perform the same operations that authors execute in the CMS UI, including:
- Create, update, and delete items.
- Rename or move items.
- Manage media assets.
- Work with workflows and language settings.
- Interface: Exposed through a dedicated GraphQL endpoint that supports both queries and mutations.
- Authentication: All calls must be authenticated. The recommended secure approach is using OAuth’s client_credentials flow to obtain a Bearer JWT access token, as detailed in Sitecore’s security documentation.
- Endpoint Structure: The endpoint is hosted on your Content Management (CM) instance, following a structure like: https://your-cm-instance/sitecore/api/authoring/graphql/v1
3. Management API
The Management API supports all administrative, system, and environment-level capabilities.
- Primary Use: Often used in CI/CD pipelines, server-side processes, and automated scripts for environment maintenance.
- Core Functions: These include operations that affect the system state or background jobs, such as:
- Triggering content publishing jobs.
- Running index rebuilds.
- Managing environment metadata and background jobs.
- Generating access tokens (such as through the client_credentials flow).
- Interface: It shares the same GraphQL endpoint as the Authoring API.
- Endpoint: same as Authoring API.Note: The distinction between the Authoring and Management API is primarily managed by the OAuth scopes assigned to the access token used for authentication, not by a different URL.
- Relationship to Authoring: While it doesn’t handle item-level content edits, it works alongside the Authoring API to support a full content lifecycle, such as writing content (Authoring API) followed by publishing it (Management API).
Enabling the Authoring and Management APIs: The Prerequisites
Before we can send our first GraphQL mutation to manage content, we have to handle the setup and security. The prerequisites for enabling the Authoring and Management APIs are slightly different depending on your Sitecore environment, but the end goal is the same: getting a secure access token.
Sitecore XM Cloud / SitecoreAI
If you’re on a cloud-native platform like XM Cloud or SitecoreAI, the GraphQL endpoints are already up and running. You don’t have to fiddle with configuration files. Your main focus is on authorization:
- Generate Credentials: You need to use the Sitecore interface (often in the Manage or Connect section) to generate a set of Client Credentials (a Client ID and a Client Secret). These are your secure “keys” to the content.
- Define Scopes: When you generate these credentials, you must ensure the associated identity has the appropriate OAuth scopes. For instance, you’ll need scopes like Sitecore. authoring and Sitecore. management to be included in your token request. This is what tells the system what your application is actually allowed to do (read, write, or publish).
Sitecore XM /XP
For traditional, self-hosted Sitecore XM installations, you have a small administrative step to get the endpoints operational:
- Enable the Endpoint: You need to deploy a simple configuration patch file. This patch explicitly enables the API endpoint itself and often the helpful GraphQL Playground IDE (for easy testing). You’ll typically set configuration settings in your CM instance.
<setting name="GraphQL.Enabled" value="true" />
<setting name="GraphQL.ExposePlayground" value="true" />
2. Configure Identity Server: Similar to XM Cloud, you then need to register your client application with your Sitecore Identity Server. This involves creating a client record in your IDS configuration that specifies the required allowedGrantTypes (like client_credentials) and the necessary allowedScopes (sitecore.authoring, etc.).
Whether you’re in the SitecoreAI or Sitecore XP/XM, the biggest hurdle is obtaining that secure JWT Bearer token. Every request you send to the Authoring and Management APIs must include this token in the Authorization header. We’ll dive into the client_credentials flow for getting this token in the next section.
Authoring API – Authentication, Requests, and Query Examples
The Authoring API exposes the full set of content-management capabilities through GraphQL. Because these operations can modify items, media, workflows, and other critical pieces of the content tree, every request must be authenticated. The Authoring API uses OAuth, and the recommended approach is the client_credentials flow.
To authorize a request, you first create a client in the Sitecore Cloud Portal. This client gives you a client_id and client_secret. Once you have them, you request an access token from the token endpoint:
POST https://auth.sitecorecloud.io/oauth/token
grant_type=client_credentials
client_id=your_client_id
client_secret=your_client_secret
audience=https://api.sitecorecloud.io
The response contains an access_token and an expiry. This token is then passed in the Authorization header for all subsequent GraphQL calls.
The Authoring API endpoint accepts only POST requests with a JSON body containing a GraphQL query or mutation. A typical request looks like this:
POST https://your-tenant.sitecorecloud.io/api/authoring/graphql
Authorization: Bearer your_access_token
Content-Type: application/json
However, the real value of the Authoring API comes from the mutations it supports. These mutations allow external systems to take over tasks that were traditionally only possible inside the CMS. They enable you to create new content, update fields, delete obsolete items, restructure information architecture, or even rename and move items. For integrations, sync services, or automated workflows, these mutations become the core building blocks. Below are a few queries that can be helpful:
1. Create Item:
mutation CreateItem(

$name: String!

$parentId: ID!

$templateId: ID!

$fields: [FieldValueInput]!

){

createItem(

input: {

name: $name

parent: $parentId

templateId: $templateId

fields: $fields

}

){

item {

ItemID: itemId

ItemName: name

}

}

}

Input Variables:

{

name = ,

parentId = ,

templateId = ,

fields = [

{ name: "title", value: "Contact US"}

{ name: "text", value: "Contact US Here"}

]

};
2. Update Item:
mutation UpdateItem($id: ID! $database: String! $language: String! $fields: [FieldValueInput!])
{
updateItem( input: { itemId: $id database: $database language: $language version: 1 fields: $fields
}
){
item { ItemID: itemId ItemName: name }
}
}
Input Variables: { id = <item-id>, database = “master”, language = “en” ,
fields = [ { name: “Title”, value: “New Title”}
{ name: “Content”, value: “New Content”} ]
};
3. Rename Item:
mutation RenameItem(
$id: ID!,
$database: String!,
$newName: String!
){
renameItem(
input: {
itemId: $id,
database: $database,
newName: $newName
}
){
item {
ItemID: itemId
ItemName: name
}
}
}
Input Variables:
{
id = <item-id>,
database = “master”,
newName = <new-item-name>
};
4. Move Item:
mutation MoveItem($id: ID!, $targetParentId: ID!){
moveItem(input: { itemId: $id, targetParentId: $targetParentId }){
item {
ItemID: itemId
ItemName: name
}
}
}
Input Variables:
{
id = <item-id>,
targetParentId = <target-parent-item-id>,
};
5. Delete Item:
mutation DeleteItem($itemID: ID!){
deleteItem(input: { itemId: $itemID, permanently: false}){
successful
}
}
Input Variables:
{
itemID = <item-id>,
};
These mutations are extremely powerful because they give you full authoring control from any external system. You can build automated pipelines, sync content from third-party sources, integrate back-office systems, or maintain content structures without needing direct access to the CMS. The Authoring API essentially opens up the same level of control Sitecore developers traditionally had through server-side APIs, but now in a clean, modern, and fully remote GraphQL form.
Management API – Authentication and Usage
The Management API sits alongside the Authoring API but focuses on administrative and system-level operations. These include running indexing jobs, publishing content, listing background jobs, working with workflows, or inspecting environment metadata. The authentication model is the same: you obtain an access token using the same client_credentials flow and include it in the Authorization header when making requests.
The Management API also uses GraphQL, though the endpoint is different. The requests still follow the same structure: POST calls with a JSON body containing the GraphQL query or mutation.
A typical request looks like:
POST https://your-tenant.sitecorecloud.io/api/management/graphql
Authorization: Bearer your_access_token
Content-Type: application/json
A common example is triggering a publish operation. The mutation for that might look like:
mutation PublishItem($root: ID!){
publishItem(
input: {
rootItemId: $root
languages: “en”
targetDatabases: “experienceedge”
publishItemMode: FULL
publishRelatedItems: false
publishSubItems: true
}
){
operationId
}
}
Input Variables:
{
root = <iten-to-publish>
};
The Management API is often used after content changes are made through the Authoring API. For example, after creating or modifying items, your external service may immediately trigger a publish so that the changes become available through Experience Edge.
The authorization workflow is identical to the Authoring API, which keeps integration straightforward: your service requests one token and can use it for both Authoring and Management operations as long as the client you registered has the appropriate scopes.
Experience Edge Delivery API – Authentication and Query Examples
Experience Edge exposes published content through a globally distributed read-only API. Unlike the Authoring and Management APIs, the Delivery API uses API keys rather than OAuth tokens for content retrieval. However, the API key itself is obtained through an authenticated request that also uses an access token.
To get the Experience Edge API key for a specific environment, you first authenticate using the same client_credentials flow. Once you have your access token, you call the Deploy or Environment API endpoint to generate or retrieve an Edge Access Token or Delivery API key for that specific environment. This token is what your application uses when querying Edge.
Once you have the key, requests to Experience Edge look more like this:
POST https://edge.sitecorecloud.io/api/graphql/v1
X-GQL-Token: your_edge_api_key
Content-Type: application/json
A basic read query might be:
query ItemExists($id: String!, $language: String!){
item(path: $id, language: $language){
ItemID: id
ItemName: name
}
}
Input Variables:
{
id= <item-id>,
language = “en”
}
Experience Edge only returns published content. If you have just created or updated an item through the Authoring API, it will not be available in Edge until a publish operation has been performed, either manually or through the Management API.
The workflow for external applications is usually:
- Obtain an access token
- Use the token to retrieve or generate the Edge API key
- Use the Edge key in all Delivery API requests
- Query published content through GraphQL
Because Edge is optimized for front-end delivery, it is highly structured, cached, and tuned for fast reads. It does not support mutations. Anything involving content modification must happen through the Authoring API.
Conclusion
When I first started working with Sitecore’s new Content APIs, the thing that stood out immediately was how much freedom they give you. With Experience Edge handling delivery and the Authoring and Management APIs covering all the write and operational tasks, you suddenly don’t have to rely on the CMS interface for everything. External systems can create, update, and publish content directly—cleanly and securely. This opens up a whole new world of possibilities. I’ve been able to build sync pipelines that keep Sitecore in perfect alignment with other systems, automate content operations that used to take hours of manual work, and push structured data like products, locations, events, or practitioner details straight from CRMs or commerce systems right into Sitecore. At the end of the day, it all boils down to an authenticated GraphQL call.
What I really appreciate is how clearly the platform separates responsibilities. The Authoring API deals with content changes. The Management API takes care of the operational housekeeping around those changes. And Experience Edge makes sure only clean, published content is delivered to any front end. Each layer does its job, and none of them gets in the way of the others. Content authors continue working exactly the way they’re used to, front-end apps stay focused on consuming published content, and integration services finally have the APIs they need to operate independently.
Together, these capabilities make Sitecore feel right at home in a modern architecture. It’s cloud-native, headless by design, and flexible enough to plug into whatever ecosystem an organization already has in place. And since everything runs through stable, secure APIs, you get predictable behavior, scalability, and confidence that your workflows can evolve as your needs grow.
This unified model—external content operations through the Authoring and Management APIs, combined with fast, consistent delivery through Experience Edge—is what makes Sitecore’s content platform genuinely powerful. It lets you build future-ready, maintainable, and automation-friendly content solutions without being locked into the traditional CMS boundaries. And in today’s world, that shift is transformational.