

Sitecore XM Cloud has revolutionized how developers, designers, and content authors collaborate by introducing powerful tools like the Component Builder and Pages application. One of the standout features is the Bring Your Own Code (BYOC) approach, which allows developers to seamlessly integrate external React components into XM Cloud. This blog walks you through a step-by-step process for implementing BYOC in Sitecore XM Cloud, offering a technical perspective to help you get started.
What is BYOC?
BYOC enables developers to import and register custom React components or entire component libraries into XM Cloud. These components can then be used in the Component Builder and Pages application, giving content authors and designers the ability to reuse and configure them without coding.
With BYOC, you can:
- Register React components scoped to a project and reuse them within XM Cloud Pages.
- Preview components in the Component Builder and Pages.
- Allow content authors to manage input parameters for components.
BYOC Framework
BYOC development process and framework.
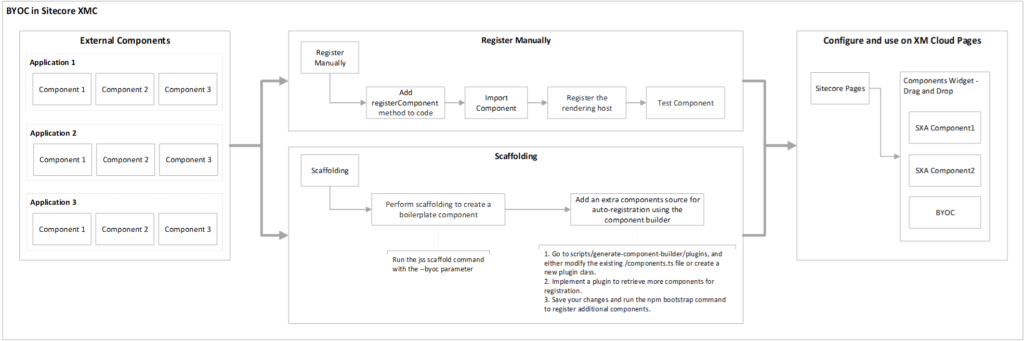
Let’s dive into the steps to implement BYOC.
Step 1: Prepare Your Environment
Prerequisites
- Access to Sitecore XM Cloud with the Component Builder enabled.
- A React application or library to be used as the external code base.
- A publicly accessible rendering host URL or a local environment for testing.
- Sitecore XM Cloud Starter Foundation (JSS version 21.6+ is recommended).
Setting Up Your Project
- Clone or Set Up a JSS App
If you’re using the XM Cloud starter foundation, it comes preconfigured with a JSS app to handle the front end. If not, set up a JSS project with React. - Verify Rendering Host Access
Ensure your rendering host URL (local or production) is accessible. This is crucial for fetching external components.
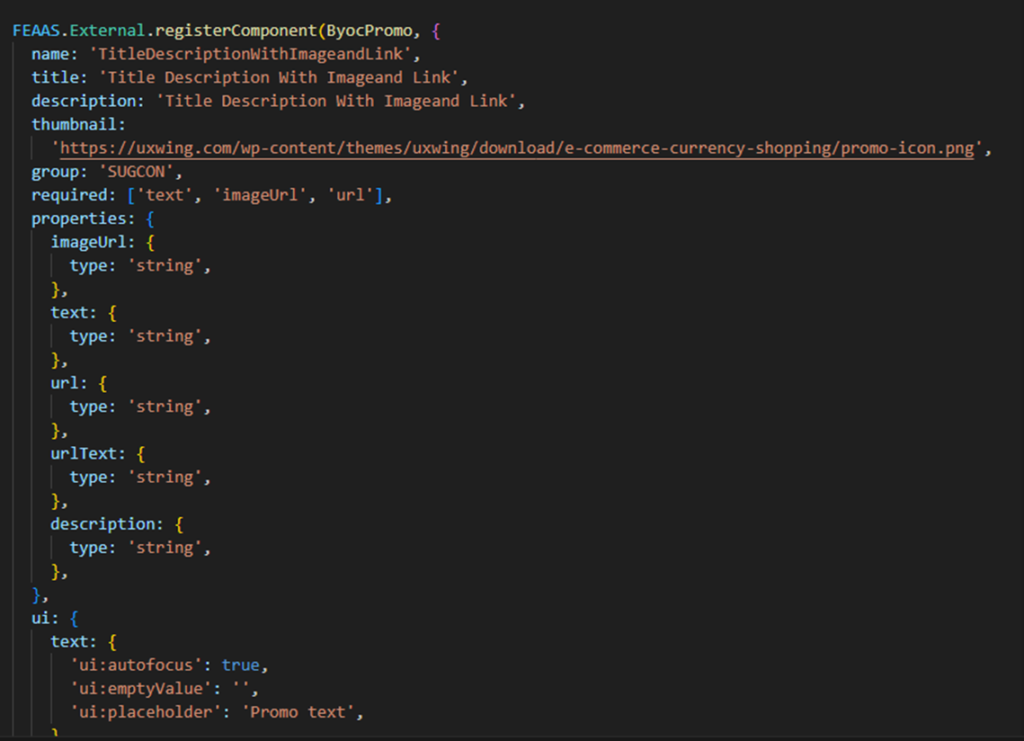
Step 2: Add the registerComponent Method
The registerComponent method is essential for registering your custom component in the Component Builder.
- Import the registerComponent Method
In your JSS app, import the required method: javascriptimport { registerComponent } from ‘@sitecore/feaas-sdk’;
- Register Your Component
Call registerComponent with the component and its properties before the builder attempts to render it.Example: javascriptregisterComponent({ name: 'CustomReactComponent', component: CustomReactComponent, properties: { title: { type: 'string', default: 'Default Title' }, description: { type: 'string' }, }, });
Step 3: Import the Component
JSS Version 21.6+
If you’re using JSS 21.6 or later, BYOC components are automatically imported based on the project structure.
JSS Version 21.5 or Earlier
For older versions, you must import components manually to ensure they aren’t removed during tree-shaking.
Add the import statement to Layout.tsx: javascript
import ‘./components/CustomReactComponent’;
For better organization:
- Use src/byoc-imports/index.client.ts for client-only components.
- Use src/byoc-imports/index.hybrid.ts for hybrid components.
Step 4: Register the Rendering Host (Optional)
When developing locally or on your own editing host, registering the rendering host allows you to debug BYOC components without deploying the app to XM Cloud.
- Open the Components app in XM Cloud.
- Go to the Settings tab and click Rendering host.
- Enter your rendering host URL and click Save.
Once registered, XM Cloud fetches your React code and updates the list of registered components.
Step 5: Preview and Use Your Component
After completing the steps above:
- Open the Component Builder in XM Cloud.
- Your registered component will appear in the components library, scoped to your project.
- Drag and drop the component onto a page.
- Configure input parameters, preview the component, and publish the page.
Troubleshooting Common Issues
Issue: “Could not find registered BYOC component server-side”
This error often occurs when there’s a mismatch between module formatting systems in the FEAAS SDK and your Next.js application.
Solution
- Download the appropriate Webpack plugin to your project:
Save the plugin file in src/lib/next-config/plugins. - Update your Webpack configuration to align with FEAAS and JSS.
- Redeploy your application.
Best Practices for BYOC
- Organize Components
Group client-only, hybrid, and server-side components into appropriate directories for better maintainability. - Test Locally
Use a local rendering host during development to test components before deploying to XM Cloud. - Document Input Parameters
Clearly define and document input parameters for each component to simplify the authoring experience. - Leverage XM Cloud Starter Foundation
If you’re starting fresh, use the starter foundation for a preconfigured setup that simplifies BYOC implementation.
Conclusion
BYOC in Sitecore XM Cloud empowers developers to seamlessly integrate React components into the Component Builder and Pages application. Singapore online casino platforms offer a range of gambling options, including slots, poker, and sports betting, offering users an array of choices for entertainment. Atmore Casino, renowned for its high-stakes atmosphere, draws gambling enthusiasts with its vast selection of table games. Meanwhile, european casinos not on gamstop allure those seeking unrestricted access to various wagering activities. To access comprehensive reviews and comparisons, visit https://www.probikerhelmets.com/king-johnnie-casino-review-6000-200-free-rounds-bonu-5 With user-friendly interfaces, these platforms enhance gaming experiences. By following this step-by-step guide, you can create reusable, dynamic components that content authors can easily manage.
Whether you’re working locally or deploying to production, Sitecore XM Cloud ensures flexibility, scalability, and efficiency for modern web development.